Step 3: prepare the configuration post
General principle: you need to edit the configuration post in order to see all elements of it. This because Discourse hides some elements, including XML tags. So, don’t worry if the configuration post does not look right: edit it, then look at it in the edit window, and everything will be there. ![]()
Make a copy of the example configuration post
In theory, you can start writing a configuration file from a blank page, but no one does that. Instead,
- Head over to the pre-prepared example configuration post (Resilient Livelihoods (XML)).
- Click on “edit”. Once in the editor window, select the whole post and copy it.
- Head back to the topic where you want to park your configuration post, edit it, select all content and paste-replace the example configuration post into it. Next, save.
At this point, you can already see the first step of the construction of your website. If the topic number of your configuration post is 12345, a website immediately appears if you type in your browser https://live.edgeryders.eu/12345. The content of the website, however, is all wrong: this is because it obeys the example configuration post. In order to make it look more like what you want, you will need, step by step, to change the configuration post.
Edit the config block
When you first open the configuration post, look at the top for the config block. It looks something like this:
<Config>
site:
  title: Research Network
  template: campaign
  theme: research
  lang: en-US
header:
  image: https://i.redd.it/x5zojh91awfz.jpg
  social: ['url', 'twitter', 'facebook', 'linkedin', 'email']
menu:
  edgeryders:
    icon: classic
    color: #fff
    url: https://edgeryders.eu
  other:
    icon: https://edgeryders.eu/uploads/default/original/2X/b/be232a915d18e16a2b3e17c3d21dc47261e42689.png
    color: #fff
    url: https://edgeryders.eu
  links:
    anchor: false
    fade: false
</Config>
- Next to
title:, type the title of your site. - Next to
icon:(underother:), copy-paste the link of the icon you want (if any). This you already have uploaded onto Edgeryders during step 2, so it has an address starting inedgeryders.eu/uploads/.
All parameters
| Parameter | Accepted Values | |
|---|---|---|
| template | name of the Vue template to load (can be ignored most cases) | |
| theme | name of the CSS theme to load (see themes) | |
| header | see header parameters (below) |
Header parameters
| Parameter | Description | Example | |
|---|---|---|---|
| image | url of the image to set as background | https://www.noc.ac.uk/files/images/story/Dan%20Grinwis%20image_.jpg | |
| position | position of the background image | 0 -300px (meaning 300px vertically up, 0px horizontally) | |
| social | social media buttons to display in the header | [‘url’, ‘twitter’, ‘facebook’, ‘linkedin’, ‘email’] |
Edit the menu block
The menu block looks like this:
<Menu style="background: linear-gradient(180deg, rgba(75,137,145,1) 2%, rgba(240,240,240,0) 190%)">
## Research Network
</Menu>
There are two things here.
-
You definitely want to change the text
Research Network. It displays to the left of the menu bar: -
You probably also want to change the first line, after
style=".styleis a general parameter used to control the aesthetics of the block. In this case, we want thebackgroundof the menu block to be a colorgradientfrom one color (the green-grey of the Research Network) to another one (white). To make a gradient from, say the green of Collaboration to white, you would need to write
<Menu style="background: linear-gradient(180deg, rgba(83,159,68,1) 2%, rgba(240,240,240,0) 190%)">
Edit the header block
The header block looks something like this:
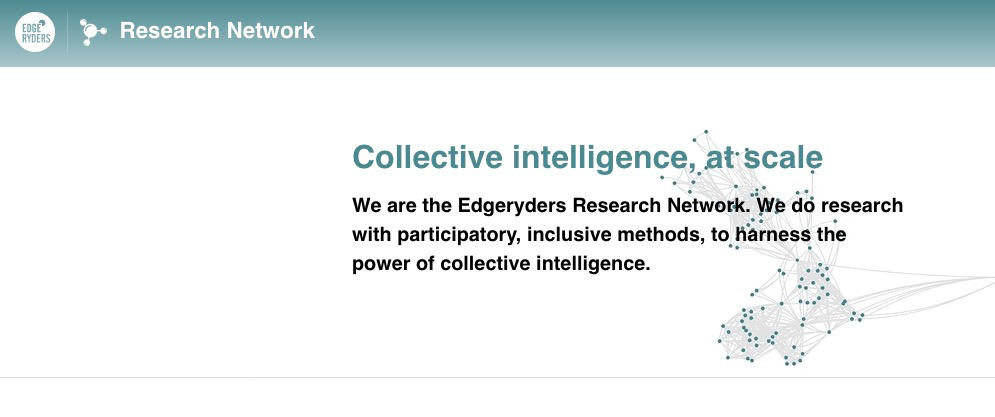
<Header style="background: url(https://edgeryders.eu/uploads/default/optimized/2X/5/5b6f4dd67b8bbca24e1f9b1106c159530b781071_2_1035x621.jpeg); background-position: 40vw -50px; background-attachment: fixed; background-repeat: no-repeat;">
<Text>
## Collective intelligence, at scale {style="color: rgba(75,137,145,1)"}
We are the Edgeryders Research Network. We do research with participatory, inclusive methods, to harness the power of collective intelligence.
</Text>
</Header>
Two things probably need changing.
- The background image. If you want a background image below your header, upload one in your assets post (see above, then put its link in the parenthesis after
background: url. It should start withhttps://edgeryders.eu/uploads/. Make sure you select one that does not interfere with the text. - The text. Just replace the sentences here with your own. Notice that we have made an exception to the rule of having all content in separate topic. This text (“Collective intelligence, at scale. We are […]”) is actually written in the configuration topic itself. This is because we have decided to have “Collective intelligence, at scale” in one color (green) and “We are […]” in another (black). The webkit can only handle one color in each block, so we have to include the other in a
{style="color: ..."}instruction. If we put everything in a different topic, it would render incorrectly.
Choose, arrange and edit the content blocks
There are several types of content blocks. The example configuration post contains at least one block for each type of content you might want. So, the first thing you want to do is look back at your wireframe scheme, and reproduce it in the form of a sequence of blocks. For example, your site might host an “about” page; a blog; and a signup form.
- The “about” page is just a static text blog.
- The blog is done by calling all the topics with the blog Discourse tag.
- The form is custom-made.
In this case:
- Locate the static page
Contentblock in the example configuration post. Copy-paste it directly under the end of theHeaderblock. Notice: theHeaderblock ends after</Header>. - Locate the Discourse tag
Contentblock in the example configuration post. Copy-paste it directly under the end of the firstContentblock, i.e. after its</Content> - Do the same thing with the form
Contentblock. - Delete all the other blocks, but do not delete the closing tag,
</Webkit>.
At the end of this phase, you have a website with the right menu, the right header, the right number and type of blocks. All is left to do is to edit each block so that it does what you want it to do.
Here is how you handle the different types of block.
The static text content block
The static text is contained in a post somewhere. This block, then, is simply a call to that post.
<Content id="methodology">
## Semantic Social Networks
<Text topic="13663/1"></Text>
<Text>
The id= declaration within <Content [...]> tells the webkit that this block is called methodology. This word shows up in the menu automatically.
The title of the section (“Semantic Social Networks”) is written directly in the configuration post for better control over the font, but it could also be in the content topic.
The topic declaration within Text says “take the text from https://edgeryders.eu/t/13663/1”. This means that, if you want to change that text, you have no need to edit the configuration post anymore: just head to the normal Discourse post containing the text, in our example https://edgeryders.eu/t/13663/1. You can verify that this post contains the same text that shows up in the websites, under the header “Semantic Social Networks”.
Adding a video to the Content block
In any Content block, simply add your video (YouTube or Vimeo) URL inside a <Text> tag:
<Text>
https://www.youtube.com/watch?v=D8XYL0gj-R8
</Text>
<Text>
https://vimeo.com/video/120778280
</Text>
Adding a picture to the Content block
There are several ways to insert pictures into a webkit site: (1) as an Image View that will be presented on its own next to or above any other view, (2) inside a text view using markdown syntax, (3) as a background image on any element using custom CSS.
1. Image View
The simplest way of adding an image would be to put a URL of the image in between an <Image> tag.
<Image>

https://edgeryders.eu/uploads/default/optimized/2X/5/5b6f4dd67b8bbca24e1f9b1106c159530b781071_2_1035x621.jpeg

</Image>
Placing an image followed by a <Text> view in the same <Content> block, will present the two side by side:
<Text>

My text on the left

</Text>

<Image>

https://edgeryders.eu/uploads/default/optimized/2X/5/5b6f4dd67b8bbca24e1f9b1106c159530b781071_2_1035x621.jpeg

</Image>
It is also possible to set an image url with the attribute url as such for a more condensed form:
<Image url="https://edgeryders.eu/uploads/image.jpeg" />
Important: If you opt for this form, remember to close the tag with a forward slash at the end of the tag.
You can apply dimensions to your image (such as width) by adding a style attribute to the tag:
<Image url="https://edgeryders.eu/uploads/image.jpg" style="width: 200px" />
This will set a width of 200px to the image.
2. Inline images
In many cases, we want to place images within a paragraph of text. To do this, use the Markdown image syntax or HTML <img> tag inside a <Text> view:
<Text>
First paragraph.

More text..
<img title="my second image" src="https://edgeryders.eu/uploads/image.jpg" />
</Text>
If I want to apply some styling to the image in markdown, I can do so using markdown attributes:
<Text>
{style="padding: 10px; border: 2px solid gray"}
</Text>
3. Background Images
Finally I can set a background image on any element using the style attribute. This is particularly useful for setting images as backgrounds on a <Header> or <Content> section:
<Header style="background: url(site.com/image.jpg); background-size: cover; background-position: center"></Header>
Displaying text and images side-by-side vs. one below the other.
Sometimes you will want to render different contents side-by-side, other times arranged in a column. To display them side-by-side, with the text in the left column and the video in the right column, use ---, like this:
<Content id = "forum">
<Text>
This is my text.
---
https://www.youtube.com/watch?v=1ag-GxG8Uiw
</Text>
</Content>
To display them in a single column, with the text above the video, close and re-open the <Text> tag, like this:
<Content id = "forum">
<Text>
This is my text.
</Text>
<Text>
https://www.youtube.com/watch?v=1ag-GxG8Uiw
</Text>
</Content>
Displaying data from Discourse
We’ve seen how to display text from a topic on a site. There are situations, where we want to present multiple topics or posts from Discourse on a site. To do this, we can use views. <Text> is one view, <Image> is another, but we also have <Table>, <Grid>, <Slider>, <Cards> and more.
These components can not only display topics from a tag or category, but any arbitrary set of data provided it is correctly formatted.
Table
The table view presents topics from a tag or category in a table format (and as a list on mobile)
<Table category="workspaces" display="date, author" search="true" />
The example above will fetch all topics from the workspaces category.
The display attribute determines to show the date or author of a selected item.
| Attribute | Accepted Values | |
|---|---|---|
| category | discourse category name (e.g. ‘campfire’ or ‘workspaces’) | |
| tag | discourse tag | |
| data | discourse topic id containing a json array | |
| display | author, date |
Grid
The grid view presents topics from a tag or category in a grid format (and as a list on mobile)
<Grid tag="covid19-event" />
The example above will fetch all topics tagged covid19-event.
The display attribute determines whether to show the date or author of a grid item.
| Attribute | Accepted Values | |
|---|---|---|
| tag | discourse tag | |
| display | author, date |
Slider
The slider view presents topics from a tag or category in a slideshow format.
<Slider tag="edgeryders-summit-conversations" />
The example above will fetch all topics tagged edgeryders-summit-conversations.
| Attribute | Accepted Values | |
|---|---|---|
| tag | discourse tag |
Cards
The cards view presents a row of cards from a tag or category or JSON data inside a topic.
<Cards template="topics" tag="webcontent-edgeryders-summit-2020-topics" />
The example above will fetch all topics tagged webcontent-edgeryders-summit-2020-topics.
The template option topics, will display the cards as topics.
| Attribute | Accepted Values | |
|---|---|---|
| tag | discourse tag | |
| template | topics |
Blog
The blog view presents topics from a tag or category in blog form: title, author, date, and a preview of the full text.
<Blog tag="sf-econ-blog" title="Blog" template="standard" items="6" columns="2" display="author, date" />`
The example above fetches the 6 most recent topics tagged sf-econ-blog, and arranges them in 2 columns.
| Attribute | Accepted Values | |
|---|---|---|
| tag | discourse tag | |
| template | topics | |
| title | string | |
| items | integer | |
| columns | integer |
Form
The cards view presents a form with fields for the user to fill in.
To set up the form a table on AirTable must be created with identical column names matching the ID of each field.
<Form airtable='airtable_base_id'>

### Form Title

### Your City

<Field id="city" type="text" placeholder="City" required="true" />

### Your Country

<Field id="country" type="text" placeholder="Country" required="true" />

### Your Personal Site / LinkedIn profile

<Field id="site" type="text" placeholder="Your Website" required="true" />

### Your Bio

Please provide 2-4 sentences about your life experience as it relates to your domain, or anything else you would like to add. (Optional)

<Field id="bio" type="textarea" placeholder="Tell us a bit about yourself" />

</Form>
The example above will display a form and post it to AirTable database with a matching base ID.
| Attribute | Accepted Values | |
|---|---|---|
| airtable | airtable base ID |