After some frustrating experiences, we decided to purchase a Zoom Pro account. This post documents our current state of best practices for our Zoom video conferences.
Content
- 1.1. Logging in
- 1.2. Scheduling a meeting with the website
- 1.3. Scheduling a meeting with a browser extension
- 1.4. Testing your bandwidth
- 1.5. Using a headset
- 1.6. Starting a meeting
- 1.7. Joining a meeting
- 1.8. Using the chat
- 1.9. Zoomtiquette
- 3.1. Remote logout
- 3.2. End-to-end encryption
- 3.3. Viewing upcoming meetings in the desktop client
- 3.4. Use with virtual desktops
- 3.5. Useful keyboard shortcuts
- 3.6. Calling across different time zones
- 3.7. Recording a meeting
1. Basic instructions
In general, Zoom is intuitive and well documented. See the Zoom Help Center for tutorials and resources.
1.1. Logging in
To log in to the Zoom website:
-
Go to https://zoom.us/signin
-
Log in with our
 Zoom login credentials (protected).
If you do not have access to the link above but still want to use our Zoom Pro account, ask one of us. If we are not using it ourselves concurrently, and you promise not to abuse it, we will give you access.
To log in to the Zoom Client software:
-
Install the Zoom Client software. The desktop of mobile client software is needed to participate in Zoom calls. If it is not already installed, please install it from zoom.us/download.
-
Start the Zoom Client software and log in with our
Zoom login credentials (protected). See about the website login above for more details.
1.2. Scheduling a meeting with the web interface
The below process is our convention for all conference calls in Edgeryders. It includes calendar integration and even reminders by e-mail before the event.
![]() IMPORTANT: Our current Zoom plan allows up to two simultaneous meetings. To make sure that your meeting cannot be blocked by parallel meetings, you must schedule your meeting. Scheduled meetings are given priority by the conventions in this manual and will never be blocked … if everyone follows the manual (more details).
IMPORTANT: Our current Zoom plan allows up to two simultaneous meetings. To make sure that your meeting cannot be blocked by parallel meetings, you must schedule your meeting. Scheduled meetings are given priority by the conventions in this manual and will never be blocked … if everyone follows the manual (more details).
![]() IMPORTANT: Our current Zoom plan allows up to two simultaneous meetings. However, usually you should not schedule meetings in parallel. This way, the option to have a parallel meeting is our backstop solution for meetings that go overtime and end up in parallel to another scheduled meeting. So by not scheduling in parallel, you don’t have to worry about blocking the Zoom room. If you know what you’re doing, you can schedule a meeting in parallel to an existing one, but then you have to worry: if another meeting follows yours, be sure to end your meeting in time before, and also communicate to the host of that other meeting if you go overtime so they don’t worry.
IMPORTANT: Our current Zoom plan allows up to two simultaneous meetings. However, usually you should not schedule meetings in parallel. This way, the option to have a parallel meeting is our backstop solution for meetings that go overtime and end up in parallel to another scheduled meeting. So by not scheduling in parallel, you don’t have to worry about blocking the Zoom room. If you know what you’re doing, you can schedule a meeting in parallel to an existing one, but then you have to worry: if another meeting follows yours, be sure to end your meeting in time before, and also communicate to the host of that other meeting if you go overtime so they don’t worry.
To schedule a meeting:
-
Go to “My account → My meetings”.
-
Click on “Schedule a meeting” and fill in the information and click “Save”. This brings you to the meeting’s details page. Details to note:
-
When enabling “Recurring Meeting”, if possible also fill out “Recurrence” and don’t just leave it at “No Fixed Time”. A meeting with “No Fixed Time” is not a scheduled meeting and might be blocked by other scheduled or spontaneous meetings.
-
Enable the option “Use personal meeting ID 306-321-0325”. Doing that consistently will slowly get rid of the task to always distribute a new meeting ID / Zoom Join URL, as we have a fixed one this way. It will not block spontaneous meetings, as such meetings cannot happen in parallel to scheduled meetings anyway to not block them.
-
-
Add the meeting to our Google Calendar “Edgeryders Events”, or to your personal Google Calendar in case you are using Zoom for non-Edgeryders purposes.
(The following explains the semi-automated process provided by Zoom, but there’s nothing wrong with creating the event manually in Google Calendar – just add the “Zoom Join URL” to the location field.)
-
Click “Add to: Google Calendar”.
-
Log in to your personal Google Account. (Probably you are already.) A screen to create a Google Calendar event will appear.
Details: This allows Zoom to create events in your calendars, but only on your computer, and only until you sign out of that Google Account again. It does not create a permanent Google Calendar integration – that setting is only for viewing Zoom meetings in the Zoom desktop client.
-
Select “Calendar: Edgeryders Events”. If you can’t see it, you need to get access first – see our Calendar Manual.
If you accidentally created the meeting in a different calendar (such as your personal default calendar “Events”), delete it as instructed below, and start again. Moving the meeting to a different calendar is possible but will make you run into several Google Calendar bugs, including: your own attendance will be automatically set to “no” and you can’t change that; and a stale event will occasionally be re-created automatically in the calendar where it was originally created, probably by Zoom.
-
Invite participants with their Google Accounts to the event. This will add the event to participants’ Google Calendars and also send them reminders before the start.
-
Add reminders to the event as appropriate.
-
Click “Save”.
-
To re-schedule a meeting:
-
Go to “My account → My meetings”.
-
Click on the title of your meeting to go to its details page.
-
Click “Edit this meeting” at the bottom, make and save your changes.
-
Click “Add to: Google Calendar” again and add the meeting again to the “Edgeryders Events” Google calendar. (This is a bug in Zoom.)
-
Delete the old calendar entry of the meeting in the “Edgeryders Events” Google Calendar. (This is a bug in Zoom.)
To delete a meeting:
-
Go to “My account → My meetings”.
-
Click on the title of your meeting to go to its details page.
-
Click “Delete meeting”.
-
Delete the calendar entry for the meeting in the “Edgeryders Events” Google calendar. (This is a bug in Zoom.)
1.3. Scheduling a meeting with a browser extension
TODO: It is not clear yet if our account’s fixed personal meeting ID can be used with the process below. If not, we don’t recommend it as always-changing meeting IDs are confusing.
As an alternative to the above process, you can download Firefox and Chrome extensions to create Zoom meetings from inside Google Calendar. Usage:
-
At first usage, click the Zoom button the browser toolbar that was installed by the extension and log into the Zoom Pro account there.
-
Create an event in the “Edgeryders Events” Google Calendar and click on the “More Options” button. Alternatively, edit an existing event. Alternatively, click the browser extension’s button and then “Schedule a Meeting”. All bring you to the detailed event edit dialogue. Always use your personal Google Account for this step; if you don’t see the “Edgeryders Events” calendar there, get access first.
-
Click “Make it a Zoom meeting”. (If still needed.)
-
Invite participants and add reminders as usual.
The meeting will now automatically appear in the “My Meetings” section in the Zoom website, and the Google Calendar event will contain the URL to join the meeting. This process is a bit more comfortable but not much: re-scheduling and deleting events need the same workarounds documented for the process in the web interface (see above).
1.4. Testing your bandwidth
The quality of the experience with conference calls depend a lot on available bandwidth. Please, before hosting a meeting always test your internet speed and choose the location that will give you more headway. You can use Google’s Internet speed test. In the Reef, the best way to host one is connect via Ethernet to the router in the office.
Internet bandwidth in different locations:
| location | downstream | upstream |
|---|---|---|
| The Reef, office, using Ethernet cable | 64 Mbit/s | 26 Mbit/s |
| The Reef, office, using router wifi | 42 Mbit/s | 26 Mbit/s |
| The Reef, living room, using range extender wifi | 10 Mbit/s | 22 Mbit/s |
1.5. Using a headset
Do not join a video or audio call using your device’s microphone and speakers. This setup is likely to trigger Larsen and echo effects. The person using the laptop’s mic and speakers can not hear the latter, but they annoy everyone else. Instead:
-
Headset. This is the best option, both for desktop and mobile devices. Depending on the device, you will need one of the following connectors: USB, 2×3.5mm TRS audio jack, 2.5 mm or 3.5 mm TRRS audio jack, Bluetooth. Headset microphones are directional microphones, so they pick up sound only when you speak close to them (≤10 cm) and directly into them – they will not work when handing them around like a handheld microphone. To prevent pop sounds from air pulses, the proper position is at nose or chin level, not directly in front of the mouth.
-
Earphones. This also avoids the feedback and echo effects: just wear earphones and speak close enough to the device’s microphone. However, the microphone is probably of lower quality, so the sound will generally not be as great. Depending on the microphone type and position, it can be fine to naturally sit in front of the device, but you might also have to place your mouth 10-15 cm in front of the microphone (with the camera off hopefully
 ).
).To know what solution is adequate, you can ask other participants or (where that is not adequate) look at the microphone signal level indicator of your audio mixer application. When speaking normally, the signal bar length should vary between 50% and 80% of its maximum (assuming the usual logarithmic scaling of the bar).
1.6. Starting a meeting
Starting a scheduled meeting. This is the usual case. At the scheduled time of the meeting, people join the meeting using their locally installed Zoom zoftware and the meeting ID or Join URL (for example 207-791-476 or 207791476 resp. https://zoom.us/j/207791476).
Allow “Join before host”. When scheduling a new meeting, there is an option to allow joining before the host, enabled by default. (The host is the first user who joins the meeting after using our Zoom Pro credentials to log in.)
When keeping the options at that, no step is necessary to start a meeting – anyone can join at any time after the start of the meeting. There is not even a need for the host to join at all.
When changing that option, the host has to join first and only after that other people can join the meeting. This makes sense for webinars and the like.
Starting an unscheduled meeting. For spontaneous meetings or sporadic recurring meetings with no fixed time, you don’t have to go through the whole “schedule a meeting” process. You can use the following process, but since you must avoid blocking scheduled meetings it’s not necessarily simpler:
-
Check at https://zoom.us/meeting or in the Zoom client (after login) in the “Meetings tab” when the next meeting is scheduled. (Meetings that are listed as “Recurring” without a date and time are not scheduled meetings. Also ignore scheduled meetings that have already been started, as you can’t block these.)
For an unscheduled meeting, you must make sure to end your meeting before any scheduled meeting (and also in due time before it, such as 30 minutes – or otherwise let the meeting organizer know you’re aware of their meeting and will finish in time). Because otherwise, your group and another group having another spontaneous meeting might end up blocking the Zoom account for the scheduled meeting, as it can host at most two parallel meetings. Since there is no way to see if another spontaneous meeting is in progress, you always have to assume it is.
-
Start the Zoom Client desktop software and log in with the Edgeryders organization’s Zoom account there.
-
Click on “Start with Video” or “Start without Video” in the Zoom Client desktop software. This will start an unscheduled meeting using Edgeryders’ fixed personal meeting ID
306-321-0325. If that room turns out to be occupied, rather click “Schedule” and schedule and then start a meeting with option “Recurring Meeting”. This will give you a meeting room for spontaneous meetings with a different ID.Our current Zoom account allows two meetings in parallel. So if two groups are having a spontaneous meeting already, you’re out of luck and won’t be able to start a new meeting. That’s why scheduled meetings are better – with the process as shown here, they have priority.
-
Tell others to join your meeting, and give them its meeting ID.
1.7. Joining a meeting
Required information. To join a meeting, you need:
- Meeting ID. That’s a 9-digit or 10-digit number that identifies a meeting.
- Meeting passcode. A shared password needed for access to the meeting. After the so-called “zoombombing” nuisance events in early 2020, Zoom made this a requirement for all meetings.
Both the meeting ID and passcode can be extracted from a “Zoom Join URL” that you’ll typically fin in an invitation. Here is an example of such a URL, with the meeting ID and passcode highlighted: https://us02web.zoom.us/j/87631795901?pwd%3Da28rWDJUcFpUcnFDM1pGWGFFZmNqZz09&sa=D&source=calendar&usd=2&usg=AOvVaw3M5pMk2gCnI8vEmzwkohB3. That URL actually contains only a hashed value of the passcode, but it works just as well as the actual passcode, which here would be 094537.
How to join a meeting. There are three main ways:
-
Desktop client. Open the Zoom desktop client yourself, click “Join Meeting” and in field “Meeting ID or Personal Link Name” enter the meeting ID. Entering a full Zoom Join URL will not work.
-
Desktop client, via browser. Open the Zoom Join URL in your browser and confirm to allow it starting the Zoom desktop client to join the associated meeting. So far, this never works under Linux, so here you’re better off to automatically redirect these URLs to the web client, using the Zoom Redirector Firefox extension.
-
Web client. Open the Zoom Join URL in your browser and let it open the web client to join that way. Both Firefox and Chrome work, but fewer audio and video quality issues are expected with Chrome, esp. on slower machines. Still, avoid using the web client when you can, because it generates much more CPU load than the desktop client, which on slower machines can lead to broken up audio when speaking, and to other quality issues.
Personal Meeting ID. A meeting organizer can choose to use either a unique meeting ID for the meeting, or to re-use the fixed, so-called “Personal Meeting ID” that belongs to the Egeryders Zoom Pro account. This personal meeting ID of Edgeryders is:
- meeting ID:
306-321-0325 - password: (unknown, may change between meetings)
- Zoom Join URL: Launch Meeting - Zoom
- mnemonic: it spells “EDGERYDERS” in a botched-up “Franco-Latin” script. Haha!

1.8. Using the chat
Like most conference call applications, Zoom comes with in-call chat functionalities. Access the chat using the dedicated button in the lower part of the app window.
In Edgeryders, we recommend using liberally the chat for any meeting with more than four people in it. It is a great way that people can make a point or take note of something the speaker just said, without interrupting her. This is particularly useful as in conference calls it can be difficult to use body language to signal that one wants to speak.
Another advantage of the chat is that its log can (and should) be saved at the end of the meeting.
Beware: if you use one-to-one chats, they will also be saved with the public chat, so they will become accessible to everyone who sees that saved file. A good rule of thumb for 1-on-1 chats is: don’t use them.
1.9. Zoomtiquette
Our experience with videoconferencing so far has suggested some rules of behavior that will make the call more pleasure for you and your workmates.
- Always use headsets. See above, but seriously. This is important. Do it.
- Join the call from a quiet room with a fast connection, if at all possible. If you know you are going to be on a train, or in a café, it is courtesy to inform the host beforehands.
- Leave the camera on. Some folks have trouble seeing conference calls as “real meetings”. We find that turning on your camera expresses courtesy and attention, and tends to make everyone’s behavior more professional. Don’t worry about other people’s bandwidth: Zoom’s servers act as “mixers” for the audio and video feed, so that other people’s bandwidth is not much affected by your choice of leaving your camera on.
- Use the chat for any meeting with more than four people in it. It is a great way that people can make a point or take note of something the speaker just said, without interrupting her .This is particularly useful as in conference calls it can be difficult to use body language to signal that one wants to speak. But beware the 1-on-1 chats (see above, 1.8).
2. Our setups
A successful videoconference depends crucially on how much care you take of the audio part. This section contains tips and tricks, both technical and organizational, for organizing video conferences.
2.1. “Reading group meeting” setup
In reading group meetings we have a hybrid situation: a physical gathering with 3-8 people, plus some more people joining from remote. We are using the following setup:
-
No video. Saves bandwidth, and there is nothing to see anyway.
-
Screen sharing. We share our screen with an on-topic image like the meeting’s e-flyer.
-
Remote interaction. Interaction with remote people is provided by chat and bidirectional audio. The chat needs a local MC to “stand watch” to the Zoom application, and tell the room remote people want to speak.
-
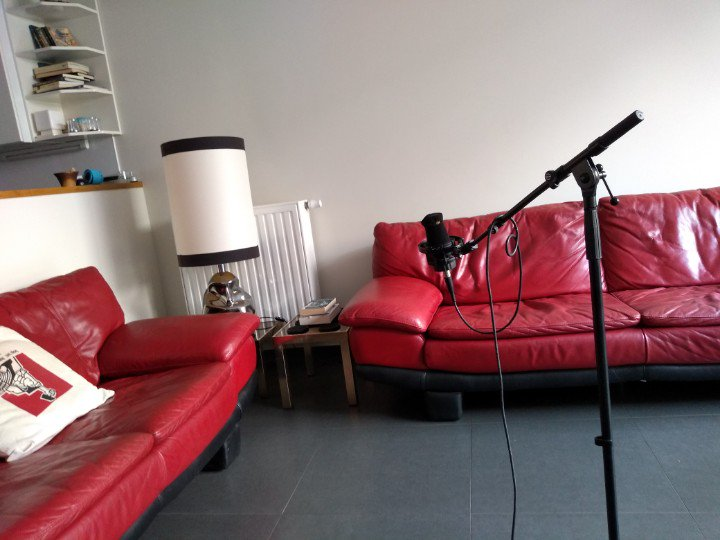
Microphone. at The Reef, we use an AKG C 414 B-TL II professional condenser microphone. Any good quality condenser mic will do. It’s important that it is a condenser, because it means that it can pick up with great clarity sound sources at 2-3 meters from the microphone. No need to pass it around, so no disruption to the conversation in the room. The polarity selector on the AKG is set to omnidirectional. The microphone is then placed on the table, or in the middle of the circle where people are going to be discussing. Omnidirectional capacity is also important. A boom is a good idea.
-
Audio board / interface. We use a Centrance MicPort Pro USB board to connect the mic to the computer. Industry standard for microphones like the AKG dictates they run on 48 V “phantom” power carried by XLR connectors; the MicPort provides that by converting USB power internally. So all you need is a normal XLR cable to connect your mic to it. To switch on phantom power, you need to press the little button on the end of the device – otherwise the microphone will not work.
-
Speakers. Audio-out is provided by any computer speaker. The laptop’s own speaker are not a bad idea: in our tests, they can be turned on at full volume at the same time as the microphone, without any feedback at all and without the remote speaker hearing her own voice echoing back.
It is probably a good idea for the local MC to keep the speakers muted, unless when a person wants to speak. This is to prevent sounds from remote (for example people sitting in cafés) to disturb the local meeting.
3. Advanced topics
3.1. Remote logout
An attractive feature of Zoom is that, if you inadvertently share your login data in a non-secure location, or if your laptop/phone/tablet with access to Zoom is stolen or lost, you can “force sign out” all devices using your Zoom account. If this happens to you, do the following:
- Go to our profile page: https://zoom.us/profile
- Click on “Sign Me Out From All Devices”
- You are prompted to change your password
Symmetrically, changing your password will sign out the account from all devices.
This feature is probably also a viable hack to unblock the Edgeryders Zoom Pro account when starting your scheduled meeting is not possible due to two meetings being in progress. If no other scheduled meeting is in progress, that means you’ll only end spontaneous meetings by people who did not follow this manual, so that’s ok ![]() Be sure to change the Edgeryders Zoom Pro account password back to its original value afterwards, as otherwise everyone would have to find out the new password before being able to log in again.
Be sure to change the Edgeryders Zoom Pro account password back to its original value afterwards, as otherwise everyone would have to find out the new password before being able to log in again.
3.2. End-to-end encryption
A Zoom meeting host can enforce end-to-end encryption of all content of a meeting, which is advisable for sensitive topics. We currently do not have it enabled by default, but could if tests confirm that there are no issues with joining or CPU load for any participant.
To enable it:
-
In the Zoom account’s web interface, go to “My Meeting Settings → Meeting → In Meeting (Basic)”.
-
Enable “End-to-end encryption”.
3.3. Viewing upcoming meetings in the desktop client
This allows to see your upcoming Zoom meetings in the “Meetings” tab of your Zoom desktop client software.
For participants (logged into a free Zoom Basic account). Set up the desktop client calendar integration as described in the Zoom Help Center. Then, the Meetings tab of your Zoom desktop client will list all events of the current day to which you have been invited via an invitation sent to your Google Account.
For hosts (logged into our Zoom Pro account). This works automatically because:
“The Meetings tab of your Zoom desktop client will show any Zoom meetings found on your calendar for that day [and] […] any meetings that you have scheduled on your Zoom account, regardless of day.”
(source, emphasis ours)
And according to our tests, “meetings that you have scheduled on your Zoom account” includes meetings scheduled with the Zoom browser extensions, as the Zoom browser extension has to be connected to this Zoom Pro account before it can be used. So it will all just work.
3.4. Use with virtual desktops
At least under Linux, the Zoom desktop software has an annoying behavior: whenever switching to a different virtual desktop, the Zoom main window will be minimized into a small 4×3 cm window hovering on top of whatever window you have on the other desktop.
This can be fixed by pinning the main window to all desktops at once. It will then be not automatically minimized, and you can put other windows you work with on top on some desktops, while having it the top window on the desktop you use for the call.
3.5. Useful keyboard shortcuts
Since the toolbar of the Zoom main window will only be active on hover during a call, the most comfortable way to access some functions is by using hotkeys. (You can however change that in the program’s accessibility settings screen under “Always show meeting control toolbar”.)
The hotkeys are all described in a Zoom support article. The most useful ones are:
-
Mute / unmute audio. Allows to use Zoom without a headset, as you can just mute yourself except when you speak, which prevents any echo feedback for others.
-
Alt + A on Windows / Linux
-
Command ⌘ + Shift + A on Mac
-
-
Display / hide the chat window.
-
Alt + H on Windows / Linux
-
Command ⌘ + Shift + H on Mac
-
3.6. Calling across different time zones
Participation from different time zones is a frequent source of frustration in conference calls. Some participants might have to compromise on joining at times that do not work well for them. This, unfortunately, can only be managed, not solved.
Another common source of frustration is that people show up too early or too late because of time zone confusion. For this, we have been recommended everytimezone. To use it, select a date and time, then click on the “link” button to get a link and share it with participants. Example:
Check you have the right time here.
The link translates that date and time into the date and time of every time zone. Hat tip: @phoresced.
3.7. Recording a meeting
Only the host of a meeting has the features available in Zoom to record the meeting and to save the chat.
Chat archiving. For saving the chat, the host does not have to remember anything. It will be saved automatically to your computer – just remember to upload / publish it after the call if required. If you are not the meeting host, you can still copy&paste the chat manually.
Recording a meeting. To record a meeting, the host has to start that manually. They will be offered a choice to record on local storage or cloud storage. There is no option to record only the audio. Since we don’t want our information to be all over the place, typically choose to record on your own computer, and then upload the result to a Google Team Drive.
After the end of the call, the Zoom client will start to convert a locally saved recording to a 75% smaller MP4 format, both in a video and audio-only version. Usually, you would keep and upload the audio and delete the video version, to save space and data transfer times. Only for calls that used screensharing extensively, keep and upload the video. If the conversion does not happen automatically (for example because the computer crashed during a call), you can start it manually at an time from the “Meetings → Recorded” area in the Zoom desktop client.
Finding the recordings again. All meetings that you recorded, whether on your computer or “in the cloud” will be accessible from within the Zoom desktop client (after login) under “Meetings → Recorded”. This also allows to open the folder with the corresponding files, which will be found here by default:
- Linux:
~/Documents/Zoom/
Recording only the audio. Recording both video and audio while being in a video call with the camera on can strain the CPU of older computers a lot. Instead, you can record the audio channel only, using other software. [TODO: Instructions for Linux, Windows, Mac OS X]
