Content
- 3.1. Introduction to optical sorters
- 3.2. Basic machine concept
- 3.3. Sorter projects for inspiration and / or utilization
- 3.4. Useful components
- 3.5. Accelerating computer vision on the Raspberry Pi
- 3.6. Programming language
- 3.7. Imaging setup
- 3.8. Raspberry Pi camera options
- 3.9. Realtime requirements
- 3.10. Motor speed and torque requirements
- 3.11. Prototype manufacturing
- 3.12. Lighting setup
6. Ideas for further development
1. Project overview
What’s this?
We are developing a small-scale, cheap optical sorter for green coffee beans. It would use image classifiers (“artificial intelligence”) and work on a Raspberry Pi 3 computer or similar.
Coffee lovers know that the quality of coffee depends a lot on the final sorting of coffee beans – 80% of beans are sorted by hand (and these are of course low-wage jobs), the rest by industrial machines called “optical sorters”. All existing optical sorters are way too costly for small-scale coffee farmers, likewise for small roasters (or community homes like The Reef ![]() ) interested in producing own high-quality coffee.
) interested in producing own high-quality coffee.
This changes with an idea I developed a few months ago to some maturity: the open source optical coffee sorter. I wrote down a more technical plan in the last section below, see there for details incl. proposed computing hardware and software. The software part includes artificial intelligence for “better than perfect” bean sorting.
In my estimate, a price of <300 USD is realistic, compared to at least 10,000 USD for Chinese-made industrial machines. Roasters in Europe indicated to me that such a machine is interesting to them as well, so there is an initial “higher end” market to serve, for example by a pre-order type of crowdfunding. Later, you’d go into mass-producing the machine and selling it to small coffee farmers who now have to sort by hand. (There is a woman empowerment aspect here, since most of the low-wage manual coffee sorting is currently done by women.)
And if you’re not into coffee, you can also adapt the concept to sort all kinds of local agricultural products: nuts, dates, fruits, spices, whatever. (Even rice and other grains is usually going through an optical sorter before it hits the market.)
Economic rationale
The optical coffee sorter is not a direct competitor to existing industrial solutions. Rather, it attempts to enable a different economic model. Its use case is a single producer or a small cluster of local producers (for example, < 10 coffee farmers in a village in Nepal) who wish to produce high quality, premium priced “single origin coffee”.
-
Technically, the optical coffee sorter should be cheap much cheaper and much more precise than industrial solutions. To obtain this, it sacrifices speed and scale, which remain much lower than those prevailing in industry.
-
Economically, the optical coffee sorter is a solution for the farmers to appropriating a higher share of the added value of “single origin coffee”, selling the product already shelled and sorted. Industrial machines are efficient at scale, and serve large roasteries. There is no point being precise, because everything gets mixed up anyway. In this model, there is no point being super-fast and efficient, because the single-origin crop is small anyway.
2. How to contribute
The first major round of development happened from January to April 2018 during the OpenVillage Academy in Sidi Kaouki, Morocco, where we worked on the machine with a small team.
We do not yet have a working machine – this will need one or two more development sprints. All output from the previous development work is documented in this text and texts linked from here.
2.1. Development environment
Our development environment is publicly viewable. The following is all the data we have for the project:
-
Central document, this very document, serving as the index document for the whole project
-
Forum, for all public online discussions about the project. Simply create a topic on edgeryders.eu and tag it
project-coffee-sorter. -
Github repository
coffee-cobra, for the coffee sorter software, running on the Raspberry Pi 3 -
Google Drive folder for all files resulting from the project; ask anyone from the development team if you need edit access
-
Dynalist tasklist for collecting and assigning all development related tasks, following Edgeryders’ usual conventions for using Dynalist
And we use the following open source software tools:
-
FreeCAD as our open source 3D CAD tool. This seems to be definitely the best available open source 3D CAD tool right now. The only alternative being BRL-CAD, which has a very old codebase. And Blender, which does not provide the nice engineering-related features of FreeCAD (measures, part design mode, FEM etc.).
-
CPython as the interpreter for the Python programming language
Some tips for FreeCAD:
-
Installation under Ubuntu Linux is very simple:
sudo apt install freecad -
By default, navigation in the scene does not properly work under Linux. You have to select a suitable navigation mode and it will start to work. If you have a touchscreen or tablet with pen input, the best navigation mode is “Gesture”: set “Edit → Preferences → 3D View → 3D Navigation: Gesture”. Alternatively, right-click on the view and choose “Navigation styles → Gesture”.
2.2. Team
A big thank you to everyone who has contributed or is interested to contribute. Meet and greet below:
-
@abhinav, leads a social enterprise that works with small-scale coffee farmers in Costa Rica (see his introduction below)
-
@ahmedmajdoub, contributed great ideas for the principle of function and drew up the first machine design
-
@alberto, helping us with the economics of this machine
-
@antoine06, a small-scale roaster from France who is looking for an optical sorter for a friend in Réunion island (see his introduction below)
-
@anu, contributing from Nepal, provided research about manual sorting and created our first dataset of coffee bean images
-
@coloursinside, interested in helping with the industrial design of the machine (see his introduction below)
-
@imake, contributed the first parts of a TensorFlow based image classifier for coffee beans
-
@matthias, project lead, needs the machine for a direct trade project involving small-scale coffee farmers in Nepal
-
@micha, interested in the machine as founder of Fairdirect e.V., an initiative for fair and direct food trade
-
@mmajdeb, contributed electronics circuit drawings
-
Phillip Chu, collaborating remotely, interested to work on the image recognition part (see his introduction)
You can contact all users who are @mentioned with their Edgeryders username with a direct message here on this platform.
3. Technical analysis and design
3.1. Introduction to optical sorters
Coffee has to be “picked” before roasting and brewing, because there are all kinds of impurities and defective beans that impact its taste. See this article for a good overview of the processes, and here for pictures of the machines involved. Essentially, in small-scale coffee farming, sorting is done manually, and very often by the women of these farms. Large companies however have high-tech machines, so-called optical sorters, that do this task full automatically. Things basically fall through them and land in the bins you want them in – see. This difference in technological leverage is also a main reason why small-scale coffee farmers are paid badly. Coffee that is free from defective beans commands higher prices – for example the widely used SCAA classification scheme relies mostly on this, and classifies coffee reasonably free from defects as specialty coffee (see). As one roaster writes: “For large, professional coffee farms, a Fair Trade membership is not meaningful as they have equipment to pick / process the raw coffee by themselves. Due to the increased quality, they obtain prices that are a multiple of those of Fair Trade.” (source, translation by me). So to support small-scale coffee farmers, incl. those I work with in Nepal, an optical sorter would help a lot, freeing much work time for the women that they can use for other tasks, while still bringing them the profits of high-quality, carefully processed coffee. It is true that manual coffee sorting brings a lot of employment (as argued here), but that employment is of very low wage. And if wages are too low, coffee farming is not profitable even for poor people – that’s exactly a complaint we heard from “our” farmers in Hansapur. There’s nothing against machines if their profit goes to the people they replace. While we can’t guarantee that in all cases when releasing an open hardware machine, we can make it so cheap that every village can afford one, just like they can afford other basic farm equipment to make their work more efficient. Now commercial optical sorters cost at least 10,000 USD – Alibaba has a list. Or around 40,000 USD for the smallest one (in used condition!) from world market leader Satake. Given the small production amounts of smallholder coffee farms, that kind of machine makes no sense at all. Let’s make an open hardware color sorter for 100 - 300 USD instead, appropriate for the amounts they have to process.
3.2. Basic machine concept
Sorting green coffee beans is essentially “density sorting”, “size sorting” (sieving) and “color sorting”. All of this is usually done with large machines. The innovation here is that we can do it all with a single digital machine. It will not be made for a high throughput. Instead it will run 24/7/365, and if you really need to scale up operations further, you add more identical machines in parallel (which also adds redundancy). We estimate below that, with proper optimization, a single Raspberry Pi 3 could sort 250-300 coffee beans per second as a pure color sorter, or 100 items per second if using AI image classification at times, as we intend to do. That results in a daily resp. yearly throughput of:
-
100 beans/s × 3600 s/h × 24 h/d × 0.171 g/bean × (1 kg / 1000 g) = 1478 kg/d = ~1.5 t/d
-
100 beans/s × 3600 s/h × 24 h/d × 365 d/a × 0.171 g/bean × (1 t / 1,000,000 g) = ~540 t/a
This is more than even a medium-sized coffee farmer coop will have to process. Even if we only achieve 10% of that throughput with the machine, it will already be useful – for comparison, a village next to “our” coffee village Hansapur (I think it’s Bichaur, but not sure) has been into coffee for long and, for Nepali standards, on a large scale. They produce 3 tons of coffee per year, which would be sorted in 20 days with a machine achieving just 10% of the throughput we hope for ( 3 t / (1.5 t/d * 0.1) = 20 d). Now 20 days is approximately half of the time the coffee harvest takes (since it ripens over the course of weeks), which means one such machine would be well enough for a village like this. The basic idea here is to combine a microgram scale and cameras in one machine to allow sizing, density sorting and color sorting. The scale determines the weight, volume is inferred from profile images takes from each of the three main axes, and from both values together the density can be calculated – which is a good indicator of quality. Size is determined from an image taken from the top. Finally, full-color high resolution images are processed with computer vision to determine any defects. Regarding that step, the color sorter market leader admits: “The green coffee bean is one of the most challenging sorts in the agriculture industry because of the slight color differences in the beans.” (source). So maybe, since we are working at slower speeds anyway, a deep learning algorithm will be the better basis compared to a faster, highly tuned but also highly fragile color sorting algorithm.
3.3. Sorter projects for inspiration and / or utilization
These projects point into the right direction how a possible implementation could look like. Some are open source and could directly serve as a basis.
-
Open source peanut sorter. It uses a Raspberry Pi and a color CCD camera to sort peanuts by by color, height/width ratio and shape, and achieved 42 kg/h by analyzing 2.5 frames per second with 4 peanuts each. See: “Image Processing Method For Embedded Optical Peanut Sorting”.
-
Open Source Walnut Sorter. Very nice, as it integrates scales just as it is intended here. See: “A Computer Vision Based Machine for Walnuts Sorting Using Robot Operating System”.
-
Cucumber Sorter, using TensorFlow. Machine vision for cucumber classification using Google’s open source neural network platform TensorFlow. Limited success so far, as even 7000 training images were not enough to go past 70% recognition rate. Also, it needs a cloud based server for computation. However it also indicates that running TensorFlow on a Raspberry Pi for the initial step of detecting if there is a cucumber on the image at all is successful. See: “How a Japanese cucumber farmer is using deep learning and TensorFlow”.
-
Screw Sorter. Maybe not open source, but all instructions and files are shared freely. Made by a guy in FabLab Moscow. See: a video, and the full instructable “Screw Sorting Machine”.
-
AutoTrash, a trash sorter using TensorFlow. A trash can using a Raspberry Pi and TensorFlow to separate compostable and recyclable trash items – see. Interesting because it is another project successfully running TensorFlow on a Raspberry Pi.
-
Various color sorters for skittles and lego. These do not provide any relevant computer vision algorithms, but the mechanics (and their control) is very similar or identical to what we need. Many tinkerers have tried their luck, and here the most inspiring machines I could find:
- High speed M&M sorting machine – Very interesting one as it uses a different mechanism: gates with linear electromagnetic actuators to divert an object in free fall. Uses an Arduino and a relay board to control these.
- M&Ms and Skittles sorting machine – Definitely the most beautiful one
 Only 3D printed and CNC cut parts and a nice, elegant design.
 - Sorting Machine - Skittles and M&M’s 8 Color Sorting – Very interesting one, as it uses a binary gate mechanism in three levels. Allows faster bin selection than a rotary mechanism, and always in the same, predictable time.
- Arduino Color Sorter Project – Simple one, but comes with Arduino source code.
- Color Sorting Machine – Sorts lego. Interesting mechanism to get items off the conveyor belt.
- Arduino Skittle Sorter – Has an ingenious “channel disk” mechanism to control target bins with a single stepper motor.
- The Unnecessarily Complicated and Over-Constrained Skittle Sorter – Like they say. It’s a three-axis CNC with a vacuum gripper. Still inspiring, as one could for example combine a delta robot and a flatbed scanner to acquire very high resolution images of many beans at once. If the bot can suck up the beans instead of moving them one by one, it could even be efficient.
- Sorting Machine - Skittles and M&M’s – Nice one, with just two servo motors and some 3D printed parts. Rate is one per second, but the mechanics could allow 4-6 per second.
- Nonstop Skittles sorting machine – Nice one, as it is fully 3D printed. Uses a conveyor belt mechanism, which allows to “park” items on a longer belt in case processing takes longer.
- High Speed Candy Sorting Machine – Attempt with air jets similar to the commercial machines. Not very successful so far, indicating that it’s not a good alternative for small-scale machinery.
-
Bext360 coffee cherry sorter. The machine works like a reverse vending machine where farmers pour in the cherries they harvested and the machine sorts and grades them and pays the harvest worker immediately. It is integrated into the Bext products for blockchain based product tracking and authentication throughout the supply chain.
3.4. Useful components
This section lists building blocks —whether hardware or software– that are probable to be useful for an open source optical sorter.
-
Raspberry Pi 4. Since its release in 2019-07, this is the favourite base hardware here. Preliminary evaluation: with its quad-core CPU, it will have about the same or better performance as the ODROID XU-4, which was our previous favourite, but for about the same price would come with 4 GiB RAM rather than 2 GiB.
-
ODROID XU-4. An alternative to the Raspberry Pi 3 that could be preferable as “cost per computing power” could be lower: the ODROID C2 uses the ARM-Cortex A53 CPU just as the Raspberry Pi 3, but at 1.5 GHz rather than the Pi 3’s 1.2 GHz, and also comes with 2 GiB DDR3 RAM rather than 1 GiB DDR2 as the Pi 3 – compare here and here. Especially the further-improved ODROID XU-4 seems the right choice, as it has at least four times the performance of the Raspberry Pi 3 in all benchmarks (see) at a price of less than two times that of the Raspberry Pi 3 (59 USD vs. 35 USD).
-
Raspberry Pi 3. Given that the Raspberry Pi 3 delivers an amazing amount of CPU computing power per dollar, it seems interesting to investigate how to implement the sorting machine with it. In terms of GFLOPS computing power of the GPU, high-end NVidia GPUs will be about half the money per GFLOPS, but still the Raspberry Pi is much preferable – for a discussion of all this, see the section on the “Nvidia Jetson TX1 / TX2” boards below.
-
OpenCV. One of the best open source computer vision libraries.
-
Plant Image Analysis.
A collection of software packages (often open source) and open datasets for analyzing images of plants and plant parts. There is nothing specialized for seeds in there right now, but I found the following open source software packages in there that can possibly be applied for this: -
TensorFlow on Raspberry Pi. TensorFlow is Google’s open source AI framework, one of the most advanced. While that sounds to be an unlikely combination, it has been successfully used in at least the following projects. TensorFlow packages for the Raspberry Pi are available.
- Caltrain delay predictor. Interesting because it again runs TensorFlow on Raspberry Pi hardware. See the project website, or an overview with links on opensource.com.
- Meter Maid monitor. Recognizes “meter maid” vehicles of the city government and then warns its users that their parking meter time is starting for real now. See the overview with links on opensource.com.
-
DeepBelief on Raspberry Pi. Another deep learning library for image classification. See source code incl. instructions for RPi. It has been ported to the RPi by Pete Warden.
-
Open source computer vision framework for Linux. A PhD thesis introducing an open source, modular, standardized computer vision system based on Linux. It includes as an industrial (but proprietary) application of a potator grader working at 40 frames per second and 28 tons per hour, inspecting the whole surface of each potato at 1 mm² resolution and evaluating it with a 9-neuron neuronal network. This high-performance system seems a good choice, even when the implementation is done “just” on a Raspberry Pi.
-
Eigen. A fast linear algebra library that is used in (for example) TensorFlow. Convolutional neural networks spend by far their most computation time on matrix multiplication, so this is a very crucial component for speed.
-
CMUcam 5 Pixy. One of the best camera modules for Raspberry Pi, ca. 70-80 EUR.
-
Qtechnolgy cameras. Industrial cameras for computer vision applications with a completely open source software stack. Interesting, but too expensive for this project (and their kind of performance is not needed here either).
-
Coffee Laboratory Digital Imaging Software. Uses a flatbed scanner to acquire images, and generates statistical reports with measurements of width, breadth, density, color values etc… For sale on coffeelabequipment.com. Not open source or anything, but an interesting take on obtaining high resolution images that could be replicated.
-
SparkFun Open Scale. A 30 USD board with an amplifier and serial data connection that allows to read weight values from connected load cells (load sensors).
-
Load cells for 0-500g. Not cheap though. Might be better to disassemble cheap off-the-shelf micro scales, like one of these.
-
Overstock notebook mainboards. This seems to be another way to get a lot of computing power for little money: mount bare notebook mainboards with powerful processors into the sorter machine. They are often available in amounts of tens or hundreds from sellers on eBay, and for very cheap because they are not very useful (only made to fit into one notebook model, and with a fixed soldered CPU). Given the x86 platform standard basic hardware support of Linux for more or less all notebooks, hardware differences would not matter much when one supply runs dry. The board mounting and power supply would simply be designed configurable.
-
x86 based SBO / COM / SOM / Mini-ITX. These are other embedded computing solutions: single board computers, computer-on-module and system-on-module devices with x86 CPUs. In addition, there are nice Mini-ITX mainboards. They would provide more computing power than a Raspberry Pi, but not nearly as cost efficient as the idea of using overstock notebook mainboards. Still here are some interesting devices and offers:
- Asus H81TMini-ITX mainboard. Very nice and cheap, at 88 EUR incl. shipment in new condition. However it does not include the CPU or RAM.
- Portwell WADE-8321 SBC. Basically the cheapest single-board computer mainboard in Mini-ITX form factor to get – right now 63 USD. Howevever it does not include a CPU, and overstock mainboards for notebooks are available for that price with a CPU already, so much superior in terms of pricing.
- More Mini-, Nano- and Pico-ITX boards. The board sizes are 170x170, 120x120 and 100x71 mm, respectively. The smaller two have only onboard CPU options.
- More Mini ITX mainboards. Quite a few of them, some with onboard processor, some with a socket. Some have DC power input just as notebooks, instead of requiring an ATX power adapter.
- Embedded computing devices at Mouser.
- COM Express COM. In sizes 125x95 mm and 95x95 mm. However, they require a carrier board for routing out all the I/O connections out. Also, as they are meant for medical devices, they will be quite expensive.
-
Used notebook CPUs (not adequate). It is true that notebook CPUs are available for very cheap (<20 EUR) by buying damaged notebook mainboards and unsoldering them. It is also technically feasible to solder them back on another mainboard (example) or to an adapter that can then fit into a mainboard with a socket. The best adapters to use are Giga-snaP BGA SMT Adapters, used for example in this project. (It is not yet clear if these adapters would fit right into existing CPU sockets like a PGA988.) The bigger problem is, however, that any fitting mainboard will cost more without the CPU than overstock notebook mainboards with CPU, so this solution makes no financial sense.
-
Nvidia Jetson TX1 / TX2 (interesting but not adequate here). These boards are optimized for AI tasks, esp. image classification, through the use of high-performance Nvidia GPUs. At 340 images per second (in AlexNet), performance is impressive, even better than that of a high-end Core i7 desktop CPU (source). Even better, energy use for image classification is about 8 times less than when using a desktop CPU (source). The problem that makes this board unsuitable for our sorter machine is the steep price of 390 GBP / 450 EUR for the TX1 developer kit – ideally the whole sorter will cost less than that, and we surely don’t want a mistake by a farmer out there in a village to cause a 450 EUR damage. However, this kind of hardware will get much cheaper over time due to competition, so it is relevant to watch. A bigger issue with NVidia GPUs is, though, that their CUDA software infrastructure for GPGPU computing is not open source. It seems possible to run OpenCL on them though, so there may be open source solutions. Assuming that, there is also the slower but still great Jetson TK1 board to consider for 140 GBP / 160 EUR. It is built around the Nvidia Tegra K1 GPU, with 290–365 GFLOPS (source). Assuming a medium 330 GFLOPS, that’s 0.48 EUR / GFLOPS (confirmed here). However the Raspberry Pi 3 has approx. 38 GFLOPS (source), deduced from the increased clockspeed (400 MHz vs. 250 MHz) and the Raspberry Pi 1’s 24 GFLOPS (source, source). At a price of 35 USD, that’s 0.85 EUR/GFLOPS, or 1.78 times the price per GFLOPS in the Nvidia board. That makes the Raspberry Pi 3 more expensive per GPU GFLOPS, but not by much, and it is still preferable for our purposes here:
- Since the RPi 3 also brings a CPU that can be tuned to give about the same performance for image classification as the GPU, it would rather mean that, with proper software tuning, 5 rather than 9 RPi 3’s would give the same performance as the Nvidia board. These cost 162 EUR, compared to the 160 EUR for the NVidia board. It will look even more favourable for the RPi when choosing the RPi Zero board.
- An array of 5 RPi’s is more redundant. In a rough environment, that would be a plus, making repairs much cheaper.
- An array of RPi’s makes a machine performance scalable. So farmers can invest in more machine processing capacity as their operations grow.
-
DIY Conveyor Belt. An attempt for an open hardware conveyor. Much larger than needed in the coffee sorter, but offers inspirations nonetheless.
3.5. Accelerating computer vision on the Raspberry Pi
So it seems we are settling on the Raspberry Pi 3 as base hardware to try implementing the optical sorter. Yes, it can do computer vision tasks, but it is a challenge for the little critter ![]() So, optimization to the rescue – for which there are many ways, as always. The tips are roughly in a recommended order of execution, based on a “performance gain for time invested” metric. A reasonable upper limit of what can be achieved can, in a very rough way, derived from the Raspberry Pi based peanut colour sorter: it achieves 10 items per second on a Raspberry Pi 1 (source). The Raspberry Pi 3’s CPU has approx. ten times the performance, so it may achieve 100 items per second. When also fully utilizing the GPU (which is realistic for all computer vision tasks), it could be 200 items per second, and together with some overclocking and code optimizations probably 250-300 items per second. That is for a pure colour sorter though. If we run deep learning based image classification for at least some beans, as we intend to, achieving even 100 items per second on average will be really good. Now, about the possible optimization measures:
So, optimization to the rescue – for which there are many ways, as always. The tips are roughly in a recommended order of execution, based on a “performance gain for time invested” metric. A reasonable upper limit of what can be achieved can, in a very rough way, derived from the Raspberry Pi based peanut colour sorter: it achieves 10 items per second on a Raspberry Pi 1 (source). The Raspberry Pi 3’s CPU has approx. ten times the performance, so it may achieve 100 items per second. When also fully utilizing the GPU (which is realistic for all computer vision tasks), it could be 200 items per second, and together with some overclocking and code optimizations probably 250-300 items per second. That is for a pure colour sorter though. If we run deep learning based image classification for at least some beans, as we intend to, achieving even 100 items per second on average will be really good. Now, about the possible optimization measures:
-
Cooling the Raspberry Pi. Simple and effective. It is reported somewhere in the Caltrain project that the RPi will run hot and reduce its clock frequency when running TensorFlow all the time. Effective cooling will keep it at speed. For the Raspberry Pi under a CPU stress test, a small heatsink was all that’s needed to keep it at ~70°C maximum (source). For hot environments and esp. when overclocking, a bath of pure ethanol in a closed container may be another option for great heat dissipation …
-
Overclocking CPU and GPU. For example, for the original Raspberry Pi 1 GPU, algorithms will run about 40% faster when overclocking it (source). It has to be researched how much overclocking is possible with the Raspberry Pi 3, if anything.
-
Low-resolution before high-resolution images. Image classifiers look at input images using small overlapping squares as input elements (e.g. 10×10 px), which makes them much faster for low-resolution images. Major ways to improve speed are, then: (1) do not feed in images in resolutions higher than needed for “perfect” sorting and (2) feed in images in a lower resolution first and only if the classifier is not “sure enough” if the bean should be rejected, feed in a higher-resolution version.
-
Colour sorting before neural networks. To increase performance, it probably works sufficiently well to look at the beans with “traditional” computer vision methods first to do colour sorting and only apply convolutional neural networks like TensorFlow when the decision is not clear for a bean yet. Given that the Raspberry Pi peanut sorter could do 10 peanuts per second, while TensorFlow on Raspberry Pi can do 2 images per second at most, that would be a performance improvement of 400-500%.
-
Running TensorFlow in C++ only. With respect to performance of TensorFlow on a RPi, the Caltrain project author publishes some statistics showing that image classification takes about 2 seconds on a Raspberry Pi 3 for one image, but also remarks there that the C+±only TensorFlow benchmark tool achieves 0.5-0.6 s runtimes on a RPi 3. They say it is not yet clear if all of this difference is due to the communication between Python and the C++ core, but it could be.
-
Also use the Raspberry Pi’s GPU. The RPI’s GPU contains 12 parallel so-called QPUs (source). On the Raspberry Pi 1, these enabled image classification with DeepBelief in 5 seconds per frame, or in 3 seconds with an overclocked GPU (source), which is several times faster than the Raspberry Pi 1’s CPU. However the CPU of the Raspberry Pi 2 is even more powerful due to the vectoring instructions of the new ARM NEON instruction set, resulting in 3.2 second per frame without overclocking (source). We can expect the Raspberry Pi 3 to be 1.33 times that speed due to higher clock speed (1.2 GHz vs. 900 MHz) and (hopefully) again 2 times that speed due to a wider bus (64 bit vs. 32 bit). So in total, 2.66 times as fast as a Raspberry Pi 2, achieving one image classification with DeepBelief in 1.2 seconds. Now the GPU will be roughly as powerful, as it was in the Raspberry Pi 2, so on average one DeepBelief image classification would happen every 0.6 seconds without overclocking. About practical solutions to utilize the Raspberry Pi’s GPU: This has been a difficult topic for years, but when Broadcom released the full VideoCore IV specs in March 2014, the open source community was able to come up with solutions. Seemingly all are based on so-called VideoCore IV “user shaders”, which are programs to run on one of the GPU’s 12 QPUs and issued to these by giving start addresses of the instructions and data (source). In terms of software frameworks to control them, we have multiple options now. The most relevant seem to be:
- QPULib
- accelerated FFT on the RPi GPU (faster by a factor of 10!)
- various examples of GPGPU hacking on the RPi
- full OpenCL is not yet supported, although there is an experimental version
-
Running multiple RPis in parallel. If necessary, there would be multiple Raspberry Pi’s processing pictures of one bean each while the respective bean is in a waiting position on a conveyor, rotating disk or similar. If pictures can be taken at rate of 30 per second (not a problem with video cameras!) and processing them takes a Raspberry two seconds for one bean, then with 60 Raspberry Pi Zero’s (60 × 5 USD = 300 USD if you get them), a throughput of 30 beans per second would be possible. That’s 18.5 kg per hour or 161 tons per year. Even better, the machine can be scaled up to higher capacities by simply adding more Raspberry Pi’s, without needing to change the mechanics.
-
Using faster neural network algorithms. For example, it is reported that one can easily achieve a practical speedup of factor 2 (and theoretically up to 4) with the Winograd algorithm. That report also says that in some cases a FFT based algorithm is even faster, and for that there is a GPU based implementation on the RPi, faster by a factor of 10 compared to the CPU version.
3.6. Programming language
So far, our plan is to use:
-
Python for all glue code / high level code running on the coffee sorter, and all scripts for managing data and training outside of the machine. Also for all machine control code, given that our current motor controller board Adafruit 2348 comes with a python library but no C / C++ library is readily available. We can create our own C / C++ library later, but a (slower running) version of the machine is already possible with the Python library. So we can consider the C / C++ extension as “optimization”, and optimization always has to come last …
-
C or C++ for a Python extension that provides “driver-like” features to control the machine, and also deals with all the time-critical realtime code (for ejecting beans etc.). Extensions can be written both in C and C++ (see). For the coffee sorter, this extension could provide access to a C / C++ library, which runs its own realtime process or thread, ideally on a dedicated CPU core. Jobs would be supplied via the extension interface to the realtime process well in advance, and the realtime process would guarantee timely execution of belt movement, bean ejection etc…
-
Python or C / C++ for all libraries. Python is acceptable for small libraries for which functional replacements can easily be found in other programming languages, while major functionality should come as C / C++ libraries (example: Tensorflow). This way, the same library code can be used when somebody wants to port the software to other programming languages, given that C / C++ libraries can be accessed from most dynamic languages via extensions of language bindings. In addition, low-level libraries for access to kernel drivers (such as I2C) should be in C / C++, as they will be needed by the other machine-control code in the Python C extensions. This is not a problem with the Raspberry Pi, as this seems to be how it is done already; see for example WiringPi, the interface library for the SPI and I2C buses.
Advantages of this setup over alternatives:
-
Popular. To make it simple for people to contribute, the chosen programming language should be widespread. This is the case for both C / C++ (TIOBE rank 2 and 3 in 2018-02) and Python (TIOBE rank 4, and the most popular dynamic language).
-
Beginner friendly. Python is a favorite language for people beginning programming, and in that role it is also the standard programming language in the Raspberry Pi ecosystem. So if we want to make modifying the coffee sorter as simple as possible for coffee farmers resp. developers and small startups close to them, P
-
It’s standard Python. With other ways to speed up Python, often language extensions and a different toolchain are employed. For example, Cython is a static Python-to-C compiler. The biggest speedups are only possible when adding static typing hints – which, then, is no longer standard Python, and the toolchain is also different. All of this makes the code less accessible for novice programmers. That is not an issue when speed-critical code is distributed as Python extensions, for example in the form of Raspbian packages.
-
Speed. It does no get much faster than using C for speed-critical parts. (Apart from the GPU utilization challenges on the Raspberry Pi for our special usecase, of course.) The split between two languages to have both speed and ease of use is also done in other, large scale software, notably Tensorflow (48% C++, 41% Python according to Github).
-
Re-usable in other languages. The concept of C / C++ extensions for dynamic languages like Python is relatively common. Ruby, PHP etc. support the same thing, and other languages at least allow cross-language bindings to C / C++ libraries. It is possible to re-use the same C code to create extensions or library bindings for these other languages as well, making it simple for people to take control of the machine with scripts. They might come up with interesting alternative uses in their “own” programming languages (sorting nuts or beans, sorting pebbles or rocks, sorting shredded plastic particles, grading grain samples etc.). For this reason, proving “proper” C code rather than auto-generated C code via Cython seems preferable, even if the speed is nearly the same.
Future speedup options:
In addition to the C extensions, there are other ways to speed up Python code. Pretty surely, these will not be needed as all time-critical code will be concentrated in the C extensions. However if we need an additional way, it should speed up the Python code while keeping it beginner-friendly, standard Python. Options include (the most appropriate first):
-
Cython with preprocessor. Cython is a static Python-to-C compiler, but to fully use its speedup options one should add static C type hints to time critical code. To keep the code still “standard Python”, we would put the Cython static type hints into preprocessor directives. They could for example look like a commented-out derivative of the previous line of standard Python code. This keeps all the normal code to be standard Python code, and it can be executed the standard way by CPython. We then use a custom Python to Cython preprocessor in order to create the higher-speed “compiled python” versions.
We would not use any other Cython special features, such as calling C code from within Python. These features do not have a direct (just slower) equivalent in Python code, so our approach to “keep Cython optional” is impossible when using these features.
An additional benefit is that the whole software can be compiled into a single executable (see). This executable still links to / includes the Python interpreter, which still handles all the dynamic typing cases.
-
PyPy. It indeed does run on the Raspberry Pi 3 (ARM v7 platform). However, all Python extensions need to be made compatible with PyPy to be able to use them there (see). And since we want to access several large C / C++ libraries from the Raspberry Pi and even create our own, Cython seems to be less overhead for our usecase. In addition, the speed gains specifically on the Raspberry Pi seem to be negligible in most cases, and in some cases it is even slower (see).
-
Nuitka. Nuitka (homepage and code) is a Python-to-C compiler that can work with the whole of the Python language, but it is (so far) not really optimized for speed (details). This shows in the benchmarks, where Nuitka is simply comparable in speed to CPython (the standard interpreter).
3.7. Imaging setup
Obviously we need a camera and a setup to reliably and automatically create in-focus raster images of individual coffee beans, with reliably good lighting conditions (esp., no shadows).
Basic options:
-
Multiple beans per frame with a lower-speed camera. The camera could be a “normal” webcam (25-30 fps) or even a still camera (<5fps), both of which are cheap and abundantly available. In each case, the camera could simply capture a few beans when they begin their travel on the fast conveyor.
We have to capture images in such a way that we can discard portions at the image edges with “half beans” because the same beans will appear in other images fully. For that, we can:
- capture a frame covering one average bean distance (about 3 bean lengths in our machine), then a new frame after the conveyor moved by half that distance
- capture a frame covering a longer distance (3-8 bean distances), then again move the frame by “frame length minus half a bean distance”. This option has less overhead in terms of finding which parts of an image contains half beans (so has to be discarded), as more fully depicted beans are contained.
-
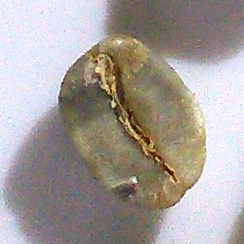
One bean per frame with a high-speed camera. At a target throughput of 100 beans per second, this requires 100 fps. High-framerate cameras have lower resolutions, but this is not a limitation in this case. For example, the official Raspberry Pi camera module v1 can do 90 fps at 640×480 px, while ca. 150×150 px per bean is sufficient to visually detect bean quality. Compare the following 150×150 px image of a coffee bean from Hansapur, Nepal:
When using a high-speed camera, we do not have to prepare and transfer pixel data (of half beans at the edges, redundantly photographed beans etc.) uselessly, saving CPU time. In addition, if we are able to capture one frame per bean, we do not have to spend CPU time of cutting out small images of individual beans from a larger image, again saving CPU time. So this solution is our targeted solution, but we have to solve how to know the position of a coffee bean to take a picture when it is in the center of the image. Solution options:
-
Stitch and split images. We would capture a frame that is only as wide as the conveyor using a high-speed camera, then move the conveyor by one frame length, then capture another frame etc… All frames are merged into a longer image, and split again by bean while also calculating the position of each bean on the conveyor. This seems to be a bad idea, because (1) we would spend time on object detection in these images, (2) stitching images together is never really precise due to lens distortions (as everyone knows from panorama photography), and in our case additionally because beans might change their position relative to the conveyor belt due to vibration etc…
-
Conveyor with buckets. We could use a non-flat conveyor, with small buckets to fix the positions for the beans, but that seems less preferable as it makes the conveyor into a special part that is complex / more costly to produce. The buckets would need open side walls so the same lateral ejector mechanism from above can be used, and we would need a feedback destination gate with a conveyor to re-process beans in cases where multiple beans made it to one bucket. In total, this seems more costly for building the product, so we do not choose this alternative.
-
Light barrier. A small laser diode lighting across the conveyor, very narrowly above the belt. A bean will block the way of the light when moving across, signaling to the Raspberry Pi to take the next image. (Or more practically, to evaluate the next frame taken by the high-speed camera in video mode.) The laser diode will have to be switched off while the picture is taken, or a wavelength has to be used that is invisible to the camera sensor. The laser diode can be controlled with the same control board used to control the solenoids.
-
Out of these options, capturing a single low-resolution frame of one coffee bean from the top, using a high-speed camera, and triggering this with a light barrier seems the option that requires the least processing time on the Raspberry Pi computer, so we intend to choose this. Also compared to multiple beans per image, the imaging setup (view angle and lighting) is much more identical between beans, simplifying the task for the decision algorithm.
3.8. Raspberry Pi camera options
Looking at hardware options specifically for the Raspberry Pi 3:
-
USB cameras. These are typically UVC devices (USB Video Class, an interface standard), so they all work with the same open source driver under Linux. UVC “webcam style” devices with USB 2.0 interface (for the Raspberry Pi) are available with high frame rates, for example the Kayeton KYT-U400 can provide 640×360 px at 330 fps (while we only need 150×150 px at 100 fps). A problem with USB cameras can be that the internal postprocessing makes the image too blurry for our purposes, usually without a way to influence it. However, some USB cameras provide access to the raw image data, such as the Leopard Imaging MT9M021C (source).
-
Official camera module. Widely available and relatively cheap (ca. 26 USD, see). However, it is not fully open source since the interface to the GPU for postprocessing is used under a NDA agreement by the Raspberry Pi foundation for developing their driver. We would have the same issue in a USB webcam, as it does the postprocessing internally, but at least it does not come with a vendor lock-in as the one-and-only official Raspberry Pi camera module, and we can treat it as a black box that at least provides an open source interface to the outside (UVC, typically). An advantage of the Raspberry Pi camera module is that it allows access to the raw image data via raspiraw, and that means indeed the raw sensor values. This allows even faster framerates than 90 fps, and also more control over the image postprocessing (examples here).
-
Other cameras with DSI interface. The official Raspberry Pi camera module interfaces to the Raspberry with a DSI interface, and other cameras are available that provide this interface. However, a driver has to be written, and the exact specifications are usually not available. So far, it seems that no other DSI camera has been made to work with the Raspberry Pi.
-
Smartphone cameras. This is just an idea for now, and probably more limited in speed than the above options. However, smartphone cameras are pretty good and pretty cheap – in fact, as most farmers will have a smartphone in the family, it would come at no additional cost. The concerned person will not need it overnight when the sorter is doing its work
The prohibitive issue will probably be connecting the smartphone camera, as it may require installing a special application to the phone etc…
3.9. Realtime requirements
We made a first rough estimation of the realtime requirements of the linear solenoids (our “bean ejectors”) to see what tool we will need for that job: just the Raspberry Pi, or a master/slave combination of Raspberry Pi and Arduino (which is much better at meeting realtime requirements).
Assuming 10.8 km/h conveyor speed and one bean every 30 mm (on average) as above, we want to use a 20 mm long ejector bar to move the bean rectangular to the conveyor. At a bean length of 10 mm, this leaves a tolerance of 10 mm way of travel during which we can safely eject the bean.
Now at 10.8 km/h, a bean travels these 10 mm in:
10 mm / (10.8 km/h) = 10 mm / (10,800,000 mm / 3600 s) = 3.33 ms
This is not too difficult to do with the Raspberry Pi 3, as this system has a latency of ~220 µs when running a realtime Linux kernel under load (see) or about 500 µs = 0.5 ms when running a stock Linux kernel (see). Means it will execute an ejection with a precision of 220 µs resp. 500 µs, well within our requirements of 3.33 ms = 3330 µs.
We had however the following other ideas to deal with the realtime requirements, if needed:
-
Let a small realtime microcontroller (Arduino based) control the linear solenoids. It would receive a set of timed instructions for future movements from the Raspberry Pi whenever it finds time to send those, and execute them in hard realtime manner.
-
Make the distances between beans on the conveyor belts large enough, and the ejector wide enough, as this increases the tolerance of when an action has to happen to be successful. (That is, it decreases the realtime requirements.)
-
Let the conveyor belts run slow enough for the Raspberry Pi to be able to eject beans properly within the realtime requirements it is able to meet (which would be “± 7 ms” or some other number).
Serialize the transport and ejection actions. For that, modify the mechanical design so that beans are moved around in fixed positions (“small buckets”), and use a design that starts and stops the conveyor for each bean movement. It will start moving again only after all required actions for moving / ejecting a bean are executed. (However, this seems to be the least useful alternative, as it would put strain on the mechanics through constant start / stop actions, and be severely limited in speed (probably <10 beans per second).)
3.10. Motor speed and torque requirements
Still to be determined. Note that there is a relationship between them: with increasing speed, the torque that the motor can deliver decreases (this makes sense, as load slows a motor down …). Example diagrams here, also available for many similar models.
3.11. Prototype manufacturing
All custom-made parts of the machine will require a CNC router (and nothing else) to be manufactured. The design can be modified easily to instead use a lasercutter.
3.12. Lighting setup
We intend to use a cool white LED lighting strip as our light source. This seems to be the most appropriate “cheap” lighting option, offering the following advantages over alternative solutions:
-
Allows flashing. Flashing is good as it allows to capture sharp images of beans in motion. Other lighting such as halogen do not allow flashing the lighting source, so would need a more complex setup of a light valve (LCD screen or mechanical) to allow flashing.
-
Low energy consumption. Not a main reason, but low energy consumption and accordingly low waste heat allows for a compact, simple and cheap machine, with a cheaper AC adapter etc… It also simplifies direct operation from photovoltaics. Note also that white LEDs are more energy efficient than trying to produce the same amount of white light with RGB LEDs (source).
-
Cool white is closer to sunlight. The color temperature itself is not relevant for color accuracy: colors will appear visually different, but are still all different from each other, so they can be told apart. Technically, color temperature can be thought of as the inclination of the line-shaped graph in an intensity vs. wavelength diagram. See the following example (from the LED lighting database):
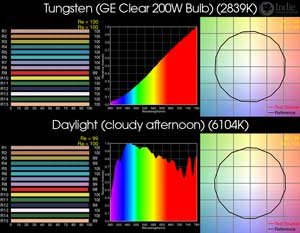
However, color temperature correction is yet another image processing step (if we chose to normalize colors, see below), and by choosing a color temperature close to daylight (the “standard color temperature”), we can avoid this step and the associated CPU time.
-
Better color rendering than RGB LEDs. White LEDs are actually blue LEDs with a phosphor coating that spreads the spectrum or emitted light to more or less the whole visible spectrum. (In some photography applications they are used separately: blue LEDs and exchangeable “remote phosphors”.) Whereas RGB LEDs have three LED colors emitting in a narrow frequency band each, with the result that a lot of colors cannot be discerned under this lighting. For a detailed explanation, see this brilliant article. It refers to LED lighting fixtures of filmmakers, which can achieve good color mixing abilities, but are also much more expensive than a cheap RGB lighting strip.
The color accuracy of our setup (lighting and camera) can be significantly improved by image post-processing. This is not relevant for machines that use a completely identical setup for both lighting and camera, as that should produce sufficiently identical images for the algorithm to work without re-tuning / re-training. However, this also creates a sort of “vendor lock-in”, so using image processing to “normalize” the colors in an image before running the decision algorithm is a better long-term alternative.
Affordable tools to normalize the colors produced by a machine include:
-
Choosing a color accurate LED. These exist and are not necessarily expensive, and avoid the need for much correction through post-processing (which, anyway, cannot invent data when light frequencies are missing from the source). See the LED database for good options. What measure to use for color accuracy in LEDs is still a matter of discussion – the old “color rendering index” (CRI) seems to be not enough. For an introduction to this topic, see here, here and here.
-
Color correction with RGB curves. Since cameras record in three independent channels per pixel (red, green, blue), we can also do the color correction independently per channel. Most image processing software (such as GIMP) has a feature for color adjustment with curves for three channels (red, green, blue). These create mappings (functions) for the source values 0…255 to target values 0…255 in any way, allowing to “normalize” any colors. It is similar to contrast spreading and contrast compression, but for three channels instead of one and segment by segment for each channel. With this mapping, it should be possible to normalize photos taken under any lighting conditions. But of course no miracles can be expected: if a certain wavelength is not present at all in the lighting source, its effect on the image cannot be simulated / determined from existing data.
-
Calibration with X-RITE ColorChecker. For proper color correction, we need a way to know how the colors should look in the camera images; the simplest way is photographing a color reference chart and comparing the RGB pixel values produced with the reference values associated with a certain color patch in a certain RGB color space. The original ColorChecker is a small color calibration card. See also Wikipedia about it. It is used in camera testing processes and to calibrate colors in RAW images of digital cameras, for example. In our case, the full color checker card will not even fit below the camera on the conveyor belt, allowing to cut the card and produce multiple ones from small snippets of each color patch. Making 16 cards out of one should be possible, and makes the original card affordable for machine producers and / or owners. Each machine might come with one of these small ColorChecker cards, so owners can re-calibrate their machine after they exchanged the camera and / or lighting parts.
-
Calibration with Third-Party ColorChecker cards. There are much cheaper versions available from Chinese manufacturers (see). These will probably not be as accurate between batches / manufacturers as the original from X-RITE, but probably accurate enough within the same batch. And buying a large amount of them for different production places will be an afforable option in this case. Another way is to calibrate these cards themselves (= determine the color correction parameters to use) by comparing it with a “master” card in a central location. Since these cards can be sent around by letter, distributing them to the various points of manufacture and / or machine owners will be possible.
-
Calibration with X-RITE Color Checker Digital SG. See here. This product has 140 color patches and is meant for automated calibration of cameras and scanners. However, it is rather expensive (ca. 370 USD).
4. Machine design
You can find a draft design for version 1.0 of the coffee sorter, and a discussion about it, in this topic:
5. Production and sale
After the initial development, the machine should be mass-produced and marketed to small-scale coffee farmers around the world for <300 USD. It will relieve them of the manual work of sorting the coffee, esp. the women as they do ~80% of that work now. And it will allow them to achieve better quality coffee than by hand-sorting, and better prices for that.
Producing the machine, on the other hand, is a business opportunity for several small manufacturing startups, since the design is open source and optimized for production in a small-scale workshop (with either a CNC router or lasercutter, but no specialized tools apart from that). The machine can be produced anywhere and marketed and shipped inside the country or even worldwide (because it is unique, and at <5 kg light enough for making parcel shipment economical). It is also small enough to be shipped as checked-in baggage when travelling by air, and nicely fits into a Euro container for protection during such transports.
6. Ideas for further development
-
Two identical conveyors. It seems possible to make the two conveyor assemblies completely identical, only driving them at different speeds by software. Using identical parts provides redundancy (between multiple machines) and also means fewer spare parts, better bulk discounts for purchasing higher numbers of identical parts, and lower production costs for custom parts.
-
Cost reduction by using GPIO pins instead of a relay control board. There are small, cheap relay boards that use one GPIO pin per relay channel. So for three output bins we need three of the Raspberry Pi’s 17 unassigned GPIO pins. (Note that in the current design, a motor controller board is used to control the linear solenoids, but it is of similar cost to a relay board.)
-
Cost reduction by using PWM pins instead of a DC motor control board. The Raspberry Pi has two independent PWM pins (source), enough to control the speed of two DC motors independently. These PWM outputs are used for the Raspberry Pi’s audio output, but since we do not need audio it’s not an issue to use them for other purposes.
-
Current limiting by using the PWM feature of the motor control board. This may or may not work, and is definitely a hack. However: our Adafruit 2348 Motor HAT has a PWM feature (used for both microstepping and DC motor control), and for another motor controller built around a similar chip (TB6612FNG rather than TB6612) this was used to provide current limiting: “In particular this motor is very well matched to the Sparkfun motor driver, Dual TB6612FNG , That’s where the low Vcc of the dual motor control makes it perfect. Its PWM feature helps provide energy efficient current limiting if you are running on a 3 V battery.” [source].
-
Combine relay and motor control on a custom board. This would use relay control via GPIO pins and motor control via PWM pins, as discussed above. The advantage would be the lower cost of board components (probably <10 USD), compared to the 43 - 50 USD total for the two motor control boards we use currently. However, creating a custom board introduces additional complexity into the machine design, production and stock-keeping for spare parts, and needs additional manual worktime during the production. In addition, we lose the mutual redundancy of the DC motor control boards (if one fails in the current design, the machine can still function with one output bin less, i.e. with 3 bins in total). So we are not yet sure if it is a good idea at all to create a custom board, but it is an idea. If shipping I2C motor control and relay boards to a country for machine production is more difficult than creating a custom board there, the idea makes sense.
-
Direct photovoltaics power. For the most remote areas with no reliable electricity connection, there is a simple way to let the machine run directly on photovoltaics power. The machine would come with one 40 - 50 W photovoltaics panel (which has the same footprint as the machine, fitting with it into a 60×40 cm Eurobox. The machine will also contain a supercapacitor for short-term energy storage, and a DC-DC converter to supply stable 5 V output to the machine from the variable output of the supercapacitor. If the energy in the supercap is running low, the machine will also run slower, to not use more than the sun can supply currently. If the machine runs out of power, it will power up at the same point and proceed. Adding a supercap might be a good idea anyway to lower the current rating requirement of the AC adaptor.
-
Feedback output channel. It would allow feeding individual beans back onto the fast conveyor, in a way so that the machine knows the identity of the bean when it comes across it again and thus can compare it with previous data about the bean. This gives additional options for the programming, for example “look at the bean as many times as needed to know what type it is with sufficient probability”.
-
Parametric design for different materials and machines. Ideally, the final 2D vector shapes to use as input for a machine would be generated by a script after specifying material thickness and machine type (CNC router or lasercutter) and any machine parameters necessary (router bit diameter). This allows to manufacture the machine efficiently with a wider range of tools and materials, making it more adapted to local settings.
-
Reversible conveyor for a closer look. Speed requirement require to use the hardware accelerated image processing of the camera (partially happening in the GPU when using the Raspberry Pi official camera module). That results in reading de-bayed “ready-made” images being read from the camera. However, when the software finds that it cannot properly decide of what category a bean is, it may be a good idea to move the conveyor backwards and take a picture in RAW mode, then doing a (slower) processing in custom code. The advantage is that RAW images (1) can provide more details since the de-bayer step is not yet done and (2) can cover a larger color space than standard sRGB (and that larger color space can even include near infrared when removing lens filters).
To be able to inspect all beans more closely, it must be possible to move a bean back from its most advanced position at the end of the conveyor. Beans put on the conveyor after it will have to be moved back as well, so the conveyor has to be approximately twice as long as the normal travel distance of beans. Beans would fall on the conveyor in the center and move to one end, except in cases when the conveyor is reversed.
The question is of course if it makes any economic sense to reverse the conveyor “just because of one bean”. Reserving one output bin for “undecidable beans” and then having a closer look at all of them in a second run with different parameters is probably faster and does not add much more complexity to the process / machine handling. -
Mirror optics. This can be combined with both imaging setups discussed above. With multiple beans per frame, to fill the 4:3 or 16:9 frame better) we could make the camera see a longer part of the conveyor in multiple rows, using some mirror optics. In this case, 45° mirror walls to the left and right of the conveyor would do the job. When capturing images from the top, we will see three rows of beans, covering three sides of the bean. For a high-precision sorting program, we can (nearly) cover two more sides by creating an image of the same bean once when it enters the image frame (“from the front”) and once when it leaved the image frame (“from the back”). Still, only one camera is used, so the solutions keeps being cheap. Similarly, mirror optics (even from four sides) can be used when capturing an image of an individual bean from the top.
-
Conveyor speed adjustment. Coffee beans are effectively “parked” on the conveyor belt while image processing takes place. So when capturing a frame with multiple beans, processing has to start with the bean that has traveled the most already, and has to be finished for each bean when that bean gets past the first solenoid that could drop it off the conveyor. In case the processing is not as fast as expected, both conveyors would be slowed down, or even stopped in the worst case. Compared to the alternative of running the conveyor at a constant but slower speed, this optimization can increase the throughput.
-
Initially, use only colour sorting and manual sorting of rejects. Currently, nearly all smallholder coffee is manually picked. The first version of the optical sorter could be a pure colour sorter that is “trigger happy” to sort beans out, because this would require the least development effort (no AI software, no perfect colour sorting needed either). It would result in a lot of false positives, and people would sort through these manually like right now. If, for example, the machine would sort out 10% of the beans for manual picking, it still means lowering the workload of manual picking by 90%. So even such a simple machine would make economic sense for farmers.
-
Using the sorter for grading coffee. One of the best additional uses for an optical sorter is for grading coffee samples by quality, for example according to the SCAA scheme. This is essential in trading any coffee, but mostly for specialty coffees, as the smaller lots mean more grading to be done, so automating it is more important. This usage could really fund the development of the machine via crowdfunding by small coffee roasters and traders. A cheap but precise low-throughput sorter is ideal for this. The only difference is that the machine should ideally have more than two bins in order to sort the defective beans by kind. This makes it simpler to double-check the results manually.
-
Innovative flavour sortings. With a machine combining a precision scales, detailed imaging and AI image classification, much more precise sorting of coffee is possible than currently. This allows some innovative uses by finding out new measurable criteria that affect taste, and sort beans accordingly to create even better-tasting coffee. For example, one could sort out the densest beans as characterized by a mostly closed central groove in the coffee bean. This is a use of the machine for specialty coffee roasters and traders, and may help to fund the development of the machine through a crowdfunding.
-
Sorting fresh cherries. The machine should also be able to sort fresh coffee cherries. This can replace floating the coffee (separating and discarding unripe and damaged coffee cherries because they float in water). It may even be way more accurate, allowing to create better quality coffees.
-
Sorting parchment coffee. The machine should also be able to sort parchment coffee. This is a new processing step that may for example help to reduce aflatoxin loads by discarding beans where the parchment shell has black spots, while the bean may still be visually unaffected.
-
Other uses. This machine is primarily for coffee, but should also be applicable or adaptable for sorting all kinds of small items, like grains, nuts, grapes etc… It should also be adaptable to sorting plastic chips by type and color, and for other non-agricultural uses. A similar machine for trash sorting and recycling, similarly low-cost to be applicable in developing regions, would be very helpful there.
-
Integrated training mode. With an attached computer, humans would classify high-resolution images of coffee beans, and mark defects where applicable. These are then used as training set for further training of the neural network, which means this method would use “deep learning”. See the video on this page for an example of a machine utilizing this method with oranges.
-
Passive solar operation. The machine should be able to operate passively on photovoltaics power (without batteries, only with a small supercap as buffer).
-
Use a transparent conveyor belt. This allows making images from top and bottom without moving the object. If needed the belt would have open glass vessels or flat glass pieces as inserts, with a flat bottom.
-
Using a “map image” as computer vision input. It is probably a good idea to transform whatever images the cameras record into a map representation of a coffee bean, and feed that into the color sorter algorithm, image classification algorithm etc… Perhaps there is even an image format to represent spherical objects without distortion (probably used for 360° images, just that here we’d use it “inverted”).
-
Maybe use a belt and a scanner CCD above it for imaging. A scanner CCD is typically 21 cm wide, allowing 20 parallel lanes on a belt for imaging coffee beans. Which makes this a very cheap, high-resolution, high-throughput image acquisition method. Obviously it will be a challenge to develop a totally smooth moving belt and to hack the scanner electronics for continuous operation (but just stopping the belt for a time to start a new “virtual page” would also do). Performance would be (say) 20×25 beans = 500 beans scanned in 20 s at 300 dpi, so 500 beans / 20 s = 25 beans/s. That is also easily achievable with serial imaging using a single video camera with a 25 fps framerate, so it’s probably not worth the effort.
-
Stop-and-go conveyor. Conveyors that can be started and stopped immediately and without causing more wear and tear in the machine make programming it much simpler and more flexible. Because essentially, all steps are sequential, avoiding all the issues with realtime requirements listed above. This is however only true is the stepper motors driving the belt can be started and stopped immediately. If it has too high momentum (speed and / or mass), it needs to start and stop with speed ramps, which again introduce realtime requirements as the momentum will make the stepper motor jump over steps that are not signaled in time (“missed steps”, resulting in a confused machine state). Immediate stop-and-go should be achievable with a very lightweight conveyor, small-ish belt rollers, and stepper motors with high holding torque.
-
Bottom imaging. Instead of double-picking or triple-picking to see the beans from all sides with a sufficiently high probability, the machine could include a mechanism that guaranteeing that. It could either flip the bean when it is passed to another conveyor, or (simpler) use a fully transparent conveyor so that the beans can be photographed from the bottom, using an upward-facing camera between the upper and lower conveyor belts. In this case, it will also need a brush or small rotating brush removing dust and debris from the underside of the conveyor, shortly after the belt turned around at the end of the conveyor.
-
Mechanical coffee sorter. This would be an interesting, much more low-tech design. It needs electronics and imaging, but stepper motors and linear actuators, and the controller board for all of these would be replaced by a mechanical mechanism as found in a hall clock where the energy is supplied by a raised mass. The remaining electronics would use simple, low-powered linear actuators with a 2 mm way of action to hook in or release hooks into gears, that way releasing or locking the movement of both the conveyors and the bean ejector. The bean ejector could be a kind of spring-supported pendulum.
7. Literature
-
“Understanding Color Image Processing by Machine Vision for Biological Materials”. An introduction to computer vision based food grading.
-
“Automatic Non-Destructive Machine Vision System for Internal Inspection of Rough Rice”
-
Buhler group coffee sorter. A dedicated commercial coffee sorter with detailed descriptions. Might offer inspiration about how to implement the open source version.